
It has taken me years to perfect the exact way I like to build wheels. It also took me some time to build up the required tooling. Some aspects are personal preference; I accept that a wheel may be built well but differently. I would also say my methods reflect many standard techniques that should be employed by any good builder. I should also point out that this brief article merely outlines the way I build wheels. There is a lot more to the art and science of wheel building than I reveal here. There are additional details in Bicycle Wheelbuilding: The Manual available to purchase and download exclusively through DCR Wheels.
Before you even get started on building wheels, you need to ensure that the products you have selected are appropriate. Variety includes rim width, depth, the material used, use of eyelets, hole count, diameter and so forth. Spokes vary in diameter, some are butted, others bladed, other aero in section, their material and quality also varies. Hubs can be front or rear with different interfaces, gearing systems, braking systems, sizes, bearing type, profile and the material used varies as well. So before making a purchase, ensure you make the correct purchase. A significant portion of Bicycle Wheelbuilding: The Manual (BWTM) is dedicated to understanding these variables to help you make an informed choice.
Once you have chosen your parts, you need to ensure that they are compatible with one another and ensure they are compatible with the bicycle you are using. They need to be attached to the frame or fork in some way. They need to accept a tyre, perhaps gears. Moreover the rim and hub need to be compatible with one another. Provided all this has been settled, you can continue with the build.
The first step of building a wheel is taking the measurements needed to calculate spoke length. These are:
– The effective rim diameter
– The centre to flange distance
– The flange diameter
You also need to know the hole number and lacing pattern.
Diagrams are provided in BWTM which show you how to take these various measurements. These measurements can then be inputted into a spoke length calculator to determine the required spoke lengths. There are calculators available to use online free of charge.
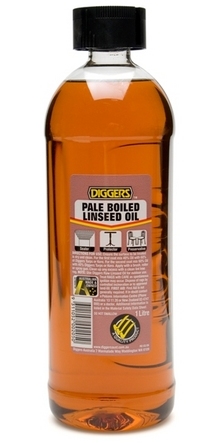
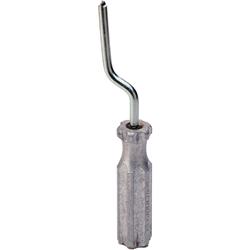
The next stage is prep. Many people miss this stage altogether but it is important. Even cheap hubs are generally finished to a fair standard. Surprisingly, by contrast, rims are often finished quite badly. Manufacturers normally leave excess swarf after drilling the spoke holes. I have a small tool for removing such excess material from spoke holes and valve holes. This material can be quite sharp, causing injury or puncture, but also adds stresses in the components which weaken them. By removing it there is also a better aesthetic finish to the rim. Some rims have eyelets and as a result this process can be avoided. I also prep spoke threads by dipping them into linseed oil or sometimes other preparations. This allows for lubrication during the build. Another benefit is after the build the oil sets and acts as a thread lock. After lubricating the spokes I leave them on a rag which absorbs any excess oil. I also spray the nipples with a modest lubricant that will disappear shortly after the build. Sometimes it is worth taking hubs apart to add additional grease/check finishes and tolerances. With all items prepped, I am ready to start lacing.
The next stage is lacing. This is perhaps the most difficult stage, although when mastered it becomes like second nature. Details and diagrams on lacing are available in BTWM along with tips for extra professionalism while lacing.
A rim will often have eccentric drilling, so each hole will have a pre-assigned flange, failure to place the correct spoke in the correct hole on the rim will put undue stress on the rim and spoke which could cause failure of either. Another point; good rims normally have double walls but only some have double eyelets. This can lead to nipples being lost in the rim in the gap between the two walls. I have a special tool to hold the nipple to prevent such an irritating set-back. Also, tightening a nipple can take some time so another time saving device I use is called a nipple driver. This is a bit like a screwdriver which allows the wheel to be laced much faster.
Other considerations are not to lace too hard early on, I lace until the threads have disappeared on the spoke. However, often when you calculate spoke lengths you round up or down by 1mm, so bear this in mind when you are lacing. It is better to round up, rather than down, but if you have rounded down the lacing will be naturally tight, if you have rounded up then the lacing will be loose.
Another consideration is nipple size. Different rims have different beds for the nipple to sit in. Please note is not a good solution to run longer nipples and shorter spokes, the same length of spoke is required when using longer nipples.
After lacing I start by adding some initial tension with a spoke key, just until the wheel starts to feel stable. Then I get it roughly true. When I true I use a special stand that I built myself. This uses a clock gauge to measure the trueness. As a result, I am in a position to guarantee that my wheels are built to within 0.1mm of trueness over the entire wheel, so that should translate into 0.05mm in either direction. The legislated industry minimum for trueness is 2.0mm either way so 4.0mm overall making my wheels about as high tolerance as possible. After truing I check the dishing – this is measuring whether the rim is sitting in the centre. To do this I using my P&K Lie jig, but you can use a dishing tool as well. The jig allows the dishing to also be very accurate. It is important to note on a rear wheel you may need to apply more tension i.e. turn the spoke key more on the drive side spokes to keep the rim in the centre. Dishing can go out if you do not bear this in mind. It is easier to get dishing right sooner rather than later which is why I do it early on. You can then maintain it over the build by checking it intermittently.
It is then time to apply more tension. I start doing this by taking in high spots in the rim. That way I can apply tension and round the wheel simultaneously. The jig allows me to work on these two dimensions simultaneously. At this point the wheel will have significant tension in it, so I stress the wheel by pulling each of the spokes towards one another, and also going round pushing the wheel in various directions and also pushing down on the top of the rim, generally mimicking the stresses that will be exerted during riding. It is important not to over stress as this can cause damage. However there are 5 different ways that I stress the wheel to ensure it is as settled as possible. I have a fixed I rest the wheel over in order to prevent loading the axle laterally. Excessive lateral loading can damage bearings.
Then I add layers of tension as required by tightening every spoke until the wheel is up to tension. My tension meter allows me to keep the spoke tensions in the centre of the manufacturers recommended range and measure this very accurately. I then even the tensions of the spokes over the wheel with the tension meter and then give the wheel another true. If you pluck the spokes at this point they should all play roughly the same note. A wheel is not a musical instrument but a good wheel is a balanced wheel, more than it being just true. A true wheel may be held awkwardly in place; however a balanced true wheel will remain true and stable. I then run a final check on roundness and dishing and then give the wheel another stress. The wheel should still be true after the stress, if it is out I re-true and re-stress until it remains stable. When the wheel is up to full even tensions, it is round, dished and true and remains so after stressing, the wheel is ready to rest. I rest all wheels overnight and then stress and check again in the morning to ensure maximum stability. A spoke freeze is applied to some nipples to prevent them from loosening.
A cautionary note on tension – the higher the tensions, the better, generally, within a wheel. However, you have to be aware of the limitations of the weakest component you are using, which is normally the rim and less often the hub. This can be affected by lacing pattern, rider weight and a number of other considerations. If you keep tensions even and at maximum, that is the maximum tension the wheel can handle and is the ultimate objective. If tensions are uneven and some spokes are at maximum, the overall tension in the wheel will be lower. So it isn’t just less stable, it will be less stiff as strong too. If in doubt, play it safe. A lower performing wheel is better than one that fails from tensions being too high.
 If you are interested in learning more about choosing wheelsets, building wheels and selecting component parts as well as information on repairing wheels please seeBicycle Wheelbuilding: The Manual an ebook which is available exclusively through DCR Wheels.